Wednesday, June 24, 2015

Layered Tila Earrings - Steel Blue


LAYERED TILA EARRINGS
  • 15/0 seed beads Miyuki "Duracoat Galvanized Pewter" (D4222)
  • 11/0 seed beads Miyuki "Duracoat Galvanized Pewter" (D4222)
  • Tila beads "Metallic Steel Gray-Blue" (TL-2064)
  • 3mm fire polished beads "Black Diamond Luster"
  • 4mm fire polished beads "Sapphire Celsian"

I made these earrings to go with my "Tallulah Tila" bracelet. They're adapted from the "Layered Tila Bracelet" pattern by MyAmari. You can get the free pattern from her Craftsy shop, HERE. I blogged about the bracelet on April 2, HERE


UPDATE: Yvonne King's (MyAmari) "Layered Tila Bracelet" pattern is now available from her blog HERE

UPDATE 6/6/19: All of the previous links to this pattern are dead. You can get the free "Layered Tila Bracelet" pattern HERE on Bead-Patterns.com.

You can download the free "Tallulah Tila Bracelet" pattern from the link on the right hand side of my blog where it says "Free Beading Patterns".

TALLULAH TILA BRACELET


Monday, June 22, 2015

Pattern Review: Bohemian Beauty Earrings

 
BOHEMIAN BEAUTY EARRINGS
  • 15/0 seed beads Toho "Antique Bronze" (223)
  • 11/0 seed beads Toho "Antique Bronze" (223)
  • 8/0 seed beads Toho "Antique Bronze" (223)
  • 15/0 seed beads Miyuki "Gilt-Lined Capri Blue Opal" (588)
  • SuperDuo beads "Metallic Suede Blue"

I've blogged a few times about some of Extrano's earring patterns. I blogged HERE, HERE and HERE about her "Persian Fans Earrings". I also posted a review of her "Retro Fans Earrings" pattern HERE. Today's post is a review of Monika's "Bohemian Beauty Earrings" pattern which you can buy from her Etsy shop, HERE. I've also got one other earring pattern from Extrano called "Swinging Cuties"  which I haven't had a chance to try yet. As you can see, Monika has some very pretty and unique earring designs.

For my review, I made the "Fan" version of the pattern. The pattern also includes an alternate design which I haven't tried because the fan earrings were my favorite.

When I started choosing my beads to make these, I discovered that I have a relatively limited choice of colors in size 15/0 seed beads to use for the accent colors. In spite of that, I was able to come up with five very pretty color combinations. In a pinch, I think they might still look very nice using all the same color 15/0 beads. I might also try using a contrasting metallic color sometime. I do have 15/0 seed beads in plenty of metallic colors.

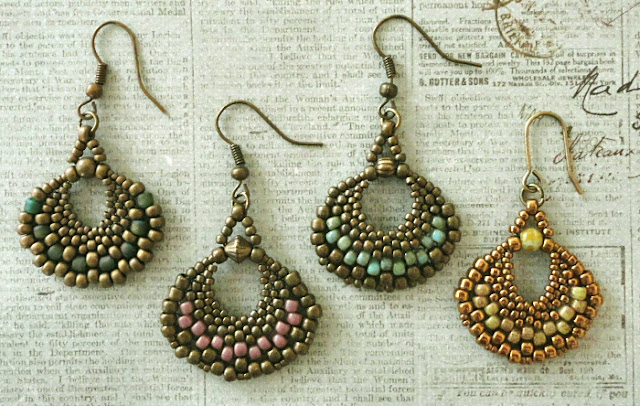
The only other problem that I had making these was that the bottom of the earrings has a tendency to warp depending on the beads that are used. I made several more samples and had the same issue every time no matter how careful I was with my tension. So, I came up with a slightly different way of embellishing the bottom edge that does help a bit but they still don't always come out completely flat. Below are three of my first sample earrings but you can't really see in the photo how the bottom edges are a little wavy. Something that you can do to help with the warping is to reinforce the bottom edge of the earrings before weaving in your thread at the end. I also found that flattening the earrings under some heavy books overnight helped quite a bit.


Here is a photo of two more sample earrings. The earring on the left was made by following the pattern as written. The earring on the right was made with my tweaks.

 
You may find that the earrings also aren't flat at various stages while making them but don't worry about that. This will be fixed when you add the subsequent rounds of beads.

I tried three different types of beading thread when I made my sample earrings to see which worked the best. FireLine works perfectly and is probably the best choice. Nymo D thread also works quite well and that's what I used to make all of the pairs of earrings posted here. I don't recommend using Nymo B. Nymo B is so fine that the earrings didn't have enough structure. They looked nice but they were much too soft.

Note that I've changed the loop at the top of all of my earrings. I made my loops "Sidonia-style". Those of you familiar with Sidonia's YouTube video tutorials will know just what I mean and I've posted instructions for this loop at the bottom of this post.

Below are four more pairs of earrings. The first pair was made by following the pattern. The last three were made with my tweak along the bottom edge.


  • 15/0 seed beads Miyuki "Light Bronze" (457L)
  • 11/0 seed beads Miyuki "Light Bronze" (457L)
  • 8/0 seed beads Miyuki "Light Bronze" (457L)
  • 15/0 seed beads Miyuki "Color-Lined Dark Olivine" (330)
  • SuperDuo beads "Green Iris Matte"


  • 15/0 seed beads Miyuki "Light Bronze" (457L)
  • 11/0 seed beads Miyuki "Light Bronze" (457L)
  • 8/0 seed beads Miyuki "Light Bronze" (457L)
  • 15/0 seed beads Miyuki "Caramel Ceylon" (421C)
  • SuperDuo beads "Opaque Ivory White"


  • 15/0 seed beads Miyuki "Dark Bronze" (457D)
  • 11/0 seed beads Miyuki "Dark Bronze" (457D)
  • 8/0 seed beads Miyuki "Dark Bronze" (457D)
  • 15/0 seed beads "Rose Lined Amethyst" (no info available)
  • SuperDuo beads "Opaque Rose Gold Topaz Luster"


  • 15/0 seed beads Miyuki "Duracoat Galvanized Pewter" (D4222)
  • 11/0 seed beads Miyuki "Duracoat Galvanized Pewter" (D4222)
  • 8/0 seed beads Miyuki "Duracoat Galvanized Pewter" (D4222)
  • 15/0 seed beads Miyuki "Matte Metallic Patina" (2008)
  • SuperDuo beads "Chalk Green Luster"

Here is what to do if you want to try my tweaked version of the earrings:

MAIN MOTIF
Steps 1-6: Do as directed by the pattern.

Step 7: Make a "Sidonia" loop. To do this, pick up seven 15/0 seed beads and go back through the bead that you exited at the top of the earring to form a loop. Go back up through the first bead on the loop. Pick up a 15/0 bead and go through the next five beads of the loop. Pick up a 15/0 bead and go through the last bead of the loop. Reinforce the loop a couple of times.

FAN SHAPED EARRING
Step 1: Do as directed by the pattern.

Step 2: Go around and exit through the 15/0 bead as directed. Pick up one 15/0 bead and then go through the outer hole of the SuperDuo bead as directed. This extra bead is needed to make the variation work. Without it there will be a gap in the beadwork.

Step 3: Pick up one 15/0 + one 8/0 + one 15/0 instead of the sizes listed in the pattern.

Step 4: Exit through the last SD. Pick up one 15/0 bead and go through the nearest 15/0 bead.

Step 5: Add four 15/0 beads around the outside point of the center SuperDuo of each trio. Omit the 15/0 bead that the pattern says to add between each trio of SuperDuos. Instead just go through the outer holes of the two SuperDuos on the sides of each trio where they touch each other.

Steps 6-7: Skip these two steps.

Step 8: Reinforce the beads along the bottom edge.


Tuesday, June 16, 2015

Opaque Grey Travertin SuperDuo Beads

This afternoon I was checking out the latest additions at Red Panda and I'm pretty sure that Betsy has a SuperDuo color, HERE, that has been very difficult to find. I found mine in a local shop but could only find them one place online through a wholesale dealer in 100 gram bags HERE. It's not exactly a pretty color but it's a nice neutral color that goes well with some of the grungy Picasso and Travertine bead colors. 

The name on the beads that I bought is "Opaque Grey Travertin" and the name on Red Panda is "Opaque Grey Dark Travertin". That's close enough to the same name and I would consider the color of the beads that I have to be fairly "dark". Betsy's photo is a lot lighter than my beads but when I darken her photo it does look like it's probably the same color.

Here is the photo from the wholesale shop:


Here is the photo from Red Panda:


Here is how the Red Panda photo looks after darkening it:


I found three blog posts where I posted projects using these SuperDuos HERE, HERE and HERE.

SOPHIA SILKY BRACELET
PLUME EARRINGS

MARY ANN BRACELET
MARY ANN BRACELET & DUO FAN EARRINGS

Sunday, June 14, 2015

Beading News: Silky Cameo Bracelet preview and more

SILKY CAMEO BRACELET SAMPLES

I probably won't have anything new to post on my blog this week because I won't be able to take any photos. My son is borrowing my camera all week while he's on vacation. I did manage to snap the photo above this morning before it started to rain. They're predicting a lot of rain for this week so photo taking might have been out of the question anyway.

Last night I started working on the "Silky Cameo Bracelet" pattern. I made more samples and got all of the steps written down. I will probably work on making the pattern illustrations this week. I experimented with some different connections between the Silky beads but I still like my original idea the best. However, I may include a couple of optional connector motifs for the pattern.

The best news is that I've altered the procedure slightly since I posted my first sample on Friday, HERE. With my new method, any type of Silky bead will have the "cameo" look and the "chains" of 15/0 seed beads will stay put along the sides of the Silkies bumps. Normally, the chains would slide off of any really slick and shiny Silkies.

Oh, and if you look closely, you'll see that I used a couple of the new 4mm "Sueded Gold" druks that I blogged about on Wednesday, HERE. The color goes very nicely with the new "Opaque Green Turquoise Picasso" Silkies that I just got in the mail yesterday from Red Panda.

 
I'm also currently working on an earring pattern review. I'll post it on my blog after I've made a few more pairs of earrings and have my camera back to take the photos.

Lastly, Deborah Roberti has a new pattern out. It's called "Eclipse Necklaces" and they go with her "Eclipse Bracelet and Earrings" pattern to make a complete set. You can buy the pattern on Around the Beading Table HERE.


Friday, June 12, 2015

Bracelet of the Day: Silky Diamonds Bracelet

SILKY DIAMONDS BRACELET
  • 15/0 seed beads Miyuki "Dark Bronze" (457D)
  • 11/0 seed beads Miyuki "Dark Bronze" (457D)
  • 8/0 seed beads Miyuki "Dark Bronze" (457D)
  • Silky beads "Alabaster Lazure Blue"
  • 3mm druks "Bronze"

This pattern by designer Connie Whittaker is from the June 2015 issue of "Bead & Button Magazine". Unfortunately, this pattern is no longer available.


I'm always on the lookout for patterns to make with Silky beads and this one is just my style. However, I ran into some problems with the pattern as written. The main Silky motifs came out very nice but the seed bead connections between them gave me fits. They wouldn't stay put and kept flipping sideways instead of sticking up and they caused the bracelet to curve. I tried quite a few different alternative connection ideas finally came up with something super simple that works very well. I think that this solution also enhances the look of the bracelet. Instead of two groups of three 15/0 seed beads between each Silky bead, I replace each trio of beads with a 3mm druk. As you can see in my bracelet above, it works perfectly.

Here is a photo of some of my experiments before I thought of using druks:


The two samples in the bottom row were made according to the pattern directions. I think that the Silkies look too crowded with those wonky seed beads between them and you can see how curved the green sample is.

The middle sample shows some of my connection experiments but I didn't like any of them. 


The top sample shows how it would look with the Silky motifs turned vertically instead of horizontally. I really like how that sample turned out and I will probably make a bracelet like that sometime. I'm going to call it "Silky Cameo Bracelet" because the motifs look like a bit like cameos to me.


  • 15/0 seed beads Miyuki "Light Bronze" (457L)
  • 11/0 seed beads Miyuki "Light Bronze" (457L)
  • 8/0 seed beads Miyuki "Light Bronze" (457L)
  • Silky beads "Alexandrite Blue Luster" and "Jade Picasso"
  • 3mm Czech pearls "Antique Gold"

Anyway, I'm glad that I thought of putting druks between the motifs. Above is my first sample made with this technique.

I love the feel of this bracelet. It's not heavy but it has some "body" because of the thickness of the Silkies. If you don't pull the druks too tight against the Silky beads, the bracelet also has some flexibility and movement. What really make the design special are the seed bead "chains" crossing over each Silky. If you recall, Teejay's "Mary Ann Bracelet" has the same Silky bead embellishment but with five 15/0 seed beads in each chain instead of four. You can read about the free "Mary Ann Bracelet" pattern HERE. As far as I know, Teejay was the first to come up with that idea because I hadn't seen it anywhere else and the magazine came out after her pattern was posted on my blog. Of course the magazine article was written long before but neither Connie nor Teejay would have been aware that the other had come up with that idea. Great minds do think alike, as they say.

TIP: It's not mentioned in the pattern but you'll need about 4 yards of thread for this bracelet. I started mine with 3 yards and had to add thread.


Thursday, June 11, 2015

The Trouble with Toho...

I recently read Sam Wescott's "Wescott Jewelry" blog and she wrote about her woes with Toho seed beads. The article is called "I am a Miyuki Snob" and you can read it HERE. I agree with what she posted and I ran into the same issue myself while making a pair of earrings to go with one of my "Elinore Bracelets". Apparently I had always used Miyuki seed beads to make that particular earring pattern because I've never had this problem before. When I make the earrings with Miyuki seed beads, the bottom netting comes out gently curved as you can see in these three photos:

I think it's that nice curve that gives the earrings their Art Nouveau look. But, when I made the pattern using Toho seed beads last week, the beads were too large which caused the netting to come out rather wonky and too square looking on the sides. My only option was to try the pattern again omitting one seed bead on each side of the netting. That solved the wonky problem but I'm still not happy with how the earring looks. The Art Nouveau look has gone missing and the bottom of the earring is too pointy. It almost looks like a boat anchor. Below you can see my two Toho samples:


The earring pattern is from Nunzia Scalpore's YouTube video tutorial which you can watch HERE.

I also ran into a similar issue when I made my "Peyote Fan Earrings" pattern a few days ago. As with the other earring pattern, this was the first time that I used Toho seed beads with this pattern too. Well, I had used Toho beads for the accent colors before but not for the main "metal" color.

Below is a photo showing four earrings made with the "Peyote Fan Earrings" pattern. The earrings on the far left and the far right were made with Miyuki metallic seed beads. The earring with the mauve accent beads was made with all Toho beads and you can see that it's much larger and wider than the two made with Miyuki beads. I don't like that those 8/0 beads on the sides at the very top stick out so much and give the edge a choppy appearance. The earrings made with Miyuki beads are smoother along the outer edge.

I have to admit though, that Toho's 15/0 seed beads worked beautifully with the peyote stitch because they're shaped very much like Delica beads. They have very straight sides and a tubular shape like Delica beads. However, Toho's 11/0 seed beads are very fat and rounded. In spite of that, they still worked pretty well with the peyote stitch. It's when I got to the rows with 8/0 beads that things started going badly. Those beads are very large and irregular and again the sides are quite straight so they don't give the smooth, even appearance that you get with Miyuki's 8/0 seed beads.

I tried something a little different with the earring with the turquoise accent beads. I used the same Toho metallic seed beads but replaced the first and last 8/0 seed bead in that row with a pair of 11/0 beads in each position. That did help smooth the sides quite nicely. However, because I used Miyuki 8/0 accent beads, which are smaller than Toho's 8/0 beads, the earring curls under at the bottom quite a bit. I like how it looks but the beadwork is much softer for some reason even though I reinforced it very well. I guess that the trick to using Toho seed beads with some patterns is to experiment until I find something that works to my satisfaction.


You can download my free "Peyote Fan Earrings" pattern from THIS post.

Wednesday, June 10, 2015

New Druk Colors - Sueded Gold

Yesterday I went to a local bead shop that I hadn't been to in a while. Since I was there last, the shop has moved to a location that's quite a bit closer to me and I wanted to check out the new location. 1960 Beads has a nice selection of the kinds of beads that I use but I didn't see much that I don't already have. However, I did find two strands of 4mm druks in colors that I haven't seen anywhere before. They are labeled as "Suede Gold" but they definitely don't have the typical suede finish. To me they look more like they've got a "halo" finish. In fact, one of the colors looks a bit like "Halo Heavens". When I got home, I searched the internet for druks with the halo finish and got nothing.

Then I had a brainstorm and took a look on the Starman site. They're a wholesale distributor of many of the Czech beads that are sold in shops everywhere. Sure enough, I found them there. This must be a brand new finish because nobody is selling them yet that I know of except for 1960 Beads. They are called "Sueded Gold" but it's not the same kind of finish as the "Metallic Suede" beads that are so popular right now.  I found my two colors in the list, which you can see HERE. I bought "Sueded Gold Light Teal" and "Sueded Gold Emerald". I'm actually not quite sure which "Teal" I have. There's a "Teal" and a "Light Teal" and they both look pretty much like what I've got. Although the tag on mine didn't specify "Light", I'm pretty sure that they are the "Light Teal". As you can see in the three photos below, all three colors look very similar:


SUEDED GOLD EMERALD
SUEDED GOLD TEAL
SUEDED GOLD LIGHT TEAL
Here's a photo of my beads:

 
If you look through the 4mm druk page on the Starman site, you'll see that there are also a few other colors with the "Sueded Gold" finish. Hopefully the bead shops will start carrying those colors soon because I'd love to get some of them. They apparently only come in 4mm and 6mm druks. Here are the other 4mm druk colors:

Sueded Gold Amethyst


Sueded Gold Tanzanite


Sueded Gold Sapphire


Sueded Gold Olivine


Sueded Gold Capri Blue


Gold Sueded Garnet


Tuesday, June 9, 2015

Four more pairs of Elinor Earrings

Here are four more pairs of "Elinor Earrings". I haven't made any bracelets in these colors but I might make myself one in the turquoise color combination. You can download the free "Elinor Bracelet" pattern HERE and the free "Elinor Earrings" pattern HERE.


  • 15/0 seed beads Toho "Antique Silver - Nickel" (711)
  • 11/0 seed beads Toho "Antique Silver - Nickel" (711)
  • 8/0 seed beads Toho "Antique Silver - Nickel" (711)
  • 8/0 seed beads Miyuki "Opaque Mauve AB" (410FR)
  • SuperDuo beads "Opaque Purple"


  • 15/0 seed beads Toho "Antique Bronze" (223)
  • 11/0 seed beads Toho "Antique Bronze" (223)
  • 8/0 seed beads Toho "Antique Bronze" (223)
  • SuperDuo beads "Metallic Suede Blue"


  • 15/0 seed beads Miyuki "Dark Bronze" (457D)
  • 11/0 seed beads Miyuki "Dark Bronze" (457D)  
  • 8/0 seed beads Miyuki "Dark Bronze" (457D)
  • 8/0 seed beads Toho "Matte Cabernet" (703)
  • SuperDuo beads "Polychrome Copper Rose"


  • 15/0 seed beads Toho "Transparent Montana Gold Luster" (204)
  • 11/0 seed beads Toho "Transparent Montana Gold Luster" (204)
  • 8/0 seed beads Miyuki Toho "Transparent Montana Gold Luster" (204)
  • SuperDuo beads "Green Turquoise Dark Travertine"