 |
| Pascale G-Mikovic's Original Bracelet |
I still don't have the real name for this bracelet, which was designed by Pascale G-Mikovic, but it's become a huge hit on Deborah Roberti's Facebook page. Pascale allowed Deb to post her photo tutorial for the basic stitch but this still left us having to guess how to do quite a few steps. At Deb's suggestion, I'm posting the basic steps that aren't shown in the photo tutorial, in particular how to turn the corners to add each row. You can click the photos to see them full size. I've only added photos to the steps that I thought required a little better explanation.
PASCALE'S "MYSTERY SUPERDUO BRACELET"
Materials:
- 11/0 seed beads (SB11)
- 8/0 seed beads (SB8)
- SuperDuo beads (SD)
- FireLine or Nymo B
- Clasp
2. Pick up one SB11 and go through the empty hole of the other SD. Go across and through the other hole of the SD then continue on through the SB11 and the other SD.

3. Pick up one SB11 + one SD. Repeat this for the length of the bracelet, ending with a SD.
4. Go through the other hole of the last SD. Add one SB11 between each SD. Once you reach the end of the bracelet, go through the SD, SB11 and SD on the end. Pull the beads snug.
5. Go through the other hole of the last SD, then go through the SB11.

6. Pick up one SB8 + SB11 + SB8. Go back around through the SB11 you just exited.

7. Continue on through the next SD and SB11.
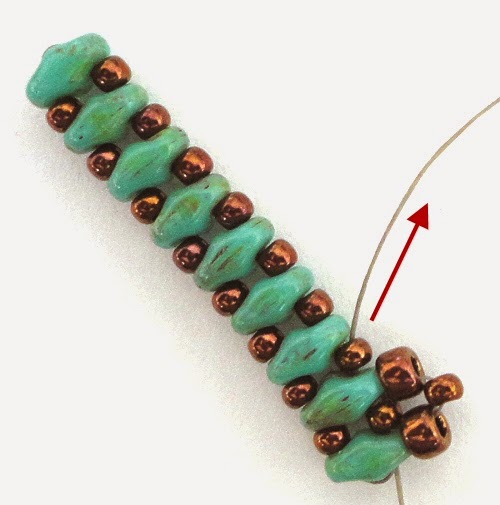
8. Pick up one SB8 + SB11. Go through the previous SB8, going toward the SD but don't go through the SD. Then go back around and through the SB11 you just exited, then continue on through the next SD and SB11. Repeat this for the length of the bracelet. At the end of the row, exit through the last SD.


11. Circle around through the next SB11, SB8 and SB11 of the little "cross" of beads near the end of the bracelet. Exit through the inside hole of the SD on the end.
"Cross" of beads highlighted in red:
 |
| "CROSS" OF BEADS |
 |
| 1 |
 |
| 2 |
 |
| 3 |
 |
| 4 |
12. Go through the other hole of the SD. Add one SB11 between each SD for the length of the bracelet. Exit through the last SD.
13. Go through the other hole of the SD then circle around through the "cross" of seed beads starting with the SB11 from the previous row.
 |
| 1 |
 |
| 2 |
 |
| 3 |
 |
| 4 |


15. Continue on through the next SD and SB11.
16. Pick up one SB8 + SB11. Go up through the previous SB8, going toward the SD but don't go through it. Then go back around through the SB11 you just exited, then continue on through the next SD and SB11. Repeat this for the length of the bracelet. Exit through the SD on the end.
17. Repeat steps 9-16, adding as many rows as you'd like for your bracelet. Finish off the ends of the bracelet and add a clasp as desired.
Inspired by Deb's comment about using 3mm beads in place of the 8/0 seed beads, I made this little sample using a variety of 3mm beads. As you can see, the pattern works quite well with druks, fire polished beads and also with bicones.

UPDATE 3/24/15: I edited the tutorial slightly and added a few more photos to steps 6-8.
UPDATE 6/30/20: Bronzepony has a YouTube video for making a bracelet that looks pretty much the same as Pascale's but she uses a different method to make hers. Click HERE to watch her video.
UPDATE 9/7/20: JP from JRPDesigns just posted a video tutorial for a bracelet that looks similar this but with all 11/0 seed beads. Her method is different than Bronze Pony's and the original from Pascale. Watch her video HERE. By the way, Bronze Pony's version also uses all 11/0 seed beads.

Thank you for taking the time to do this tut and sharing it with us...it is much appreciated.
ReplyDeleteThank you for the pattern, but how do I print it out.
ReplyDeleteNancy Leitner
You can copy and paste it into a word processor program such as Word.
DeleteI love how in-depth you went explaining the steps and highlighting! This reminds me of RAW...I thought I would try making the rows of SD separately and, using RAW, connecting them with some nice 3mm druks I will try to post a pic for you. Thank you so much for your time and the experimental patches of varied beads and colors. I find these EXTREMELY fascinating and creatively stimulating. Have a blessed day.��
DeleteThank you for your time and effort. It is very generous of you and it's appreciated.
ReplyDeleteThank For doing this Tutorial for everyone. It is so appreciated
ReplyDeleteMerci d'avoir pris le temps, gratuitement, de nous donner la marche à suivre!!!!!!!!!!!
ReplyDeletesuper merci pour le shéma
ReplyDeleteYou're welcome.
DeleteThank you so much for sharing your talent with everyone. I love this bracelet :)
ReplyDeleteThank you for sharing! It worked up beautifully!
ReplyDeleteI will try it thank you
ReplyDeleteThank you for a Great new way to use superduo's this is easy and so versatile love the new Idea!!!
ReplyDeleteYou can thank Pascale for coming up with the idea. She gave me permission to post her tutorial with my photos here on my blog.
DeleteThank you. I will work with Superduo first, then I think I would try Czech triangles - they have 2 holes and would add some texture, but have to be careful to use them on one side for it - what do you think? I don't have anything on my blog yet, but I'll work on it someday - I promise.
ReplyDeleteI've never used the triangle beads. They don't appeal to me for some reason.
DeleteThanks so much....Nice work...I will try to do....Regards from Lima.PERU
ReplyDeleteI would name it Coliseum bracelet.
ReplyDeleteI can see why. It does look a bit like the Roman Coliseum, doesn't it?
DeleteLinda, Thank you for taking the time to create this tutorial, greatly appreciated.
ReplyDeleteMary D.
Thankfully, Pascale allowed me to post it.
Deletehow would you add a claps? What kind of clasp? can you show the work? Thank you
ReplyDeleteI haven't made one as wide as the original one but here are two posts where you can see how I attached my clasp:
DeleteBracelet of the Day: Mystery SuperDuo Bracelet Updated
Mystery SuperDuo Bracelet Set - Turquoise & Silver
Merci!!!!!!!!!!!!!
ReplyDeleteThanks for this! It really helped! Gael :-)
ReplyDeleteYou're welcome.
DeleteHi ! Thank you very much for the tutorial ! :)
ReplyDeleteI did a little article about it in my blog here :
http://gomemetalsmith.blogspot.ca/2016/02/tuto-teste-mystery-superduo-bracelet.html
I really like the blue one that you made in your other article. Beautiful !
Have a nice day
//GOME
That's a nice article on your blog, Gabrielle. I looked at the video that you linked to and it does look the same as Pascale's bracelet except that she uses two needles to make it. Did you make yours that way or with one needle? I don't enjoy two needle projects so I avoid them whenever possible.
DeleteI forgot to mention that I love the colors that you used for your bracelet, Gabrielle.
DeleteYou're very sweet to share this pattern. I know it's very time consuming. Thank you
ReplyDeletethank you very much for sharing
ReplyDeleteI loved this design so much, I had to try it myself! It is such a beautiful bracelet and the tutorial was easy to follow. Thanks a lot! You can see my version here: http://fortissima-blog.blogspot.be/2016/12/zipit.html.
ReplyDeleteMy bead group made this when you originally posted it--it was a big hit! Now that we have some new members, we are planning on doing it again at our next meeting. Do you know if anyone has tried this with Twin beads instead of super duos? Thanks for the pattern and any help with this question you can offer.
ReplyDeleteI don't think I've heard of anyone using Twin beads but why not give them a try?
DeleteHow do you add the clasps
ReplyDeleteI intentionally left off that part because it depends on how wide you're making the bracelet. You can see how I add my loops for the 2-row version in THIS post. If you make a 3-row bracelet, a leather slide clasp and jump rings works wonderfully. Read some of my recent posts about the 3-row bracelets to see how I attached them.
DeleteWonderful thank you so much,you are avery talented ladythat explains everything brillantly .
ReplyDeleteThank you
Deleteneed to know how long the thread should be for the mystery super duo bracelet
ReplyDeleteI use about 3 yards to make the 2-row version. You would probably need to add at least another yard to make a wider one.
DeleteI’m a bit late to this party, but would love to give it a try. Is the quantity of each bead type noted somewhere? Thanks so much!
ReplyDeleteHi. There are many variables involved that make it difficult to predict how many beads you might need. It would depend on your wrist size, the number of rows in your bracelet and the number of different colors you want to use.
DeleteI can give you a rough estimate for the two-row bracelet because that's the kind that I usually make. For my 6-inch wrist, I use about 88 SuperDuos. For bracelets that fit 7 1/2 and 8 inch wrists, I use 96-104 SuperDuos. You would use a third more beads to make a 3-row bracelet or twice as many to make four rows.
That is super helpful, thank you so much!
DeleteWOULD YOU HAPPEN TO HAVE A VIDEO OF THIS?
ReplyDeleteI don't have a video of my own but Bronzepony has one for a bracelet that looks pretty much the same. However, she uses a different method to make hers. Click HERE to watch her video.
DeleteIs there a video of this with #8 seed beads like yours. I like Bronzepony, but cannot figure how to add the 8’s! Thank you so much, I’m just a visual learner!
ReplyDeleteI haven't found a video that makes it the same as this version.
DeletePerfect whip together for a little vacation beading. Thank you!
ReplyDeleteYes it is. I've made loads of the 2-row ones.
DeleteThank you for taking the time and sending the images of this beautiful bracelet and for all the helpful video links. I recently purchased bright pink SDs and wasnt sure how to use them and this bracelet pattern seems perfect.
ReplyDeleteYou're welcome, Snowflake.
DeleteI thought I would be able to copy this, I don't have room to sit in front of computer to make it.
ReplyDeleteUnfortunately, I wasn't given permission to post it as a PDF file for download. Send me an email using the contact form on the right and mention this pattern.
DeleteLinda, thank you so much for this. I’ve wanted to make this but couldn’t wrap my brain around it. Your tutorial makes me confident that I can make this now. I’m planning on making a pink/purple version for my mum. Thanks again, Heather in CA.
ReplyDeleteYou're welcome, Heather. It's not difficult once you get the hang of it. I've made almost twenty of these in all different colors.
Delete