
SEMI-CIRCULAR EARRINGS
- 15/0 seed beads Miyuki "Dark Bronze" (457D)
- 11/0 seed beads Miyuki "Dark Bronze" (457D)
- 8/0 seed beads Miyuki "Dark Bronze" (457D)
- 11/0 seed beads "Matte Mauve" (F463M)
- 3mm bicones "Purple AB" (from China)
I found THIS free tutorial online recently and had to give it a try. It's in Russian but there are photo diagrams of some of the steps. You'll need seed beads in 15/0, 11/0 and 8/0 to make them and also some 3mm bicones. After making a few pairs of these, I decided to see if 3mm rondelles would work and they do. I might even like them better than bicones. They both give the earrings a fun bit of sparkle.
UPDATE: I have removed the link to the tutorial because it leads to an infected website.
Once I figured out the basic method for making these, I changed a few things. The main change was in the way she starts out making them. Trying to make a string of peyote stitch like she does is very awkward. So, I picked up the seed beads for the first row of peyote and at the same time picked up the beads for the top of the earrings and made them into a loop. It was so much easier to hold onto the work that way. Another other thing I changed was the loop at the top for the earring wire. Lastly, I decided that a double row of bicones across the bottom looked too crowded. However, adding just a single row left gaps between the beads but I filled them nicely with seed beads.
I haven't made a complete pair of these yet but I've made lots of samples to inspire you:

- 15/0 seed beads Miyuki "Dark Bronze" (457D)
- 8/0 seed beads Miyuki "Dark Bronze" (457D)
- 11/0 seed beads Toho "Higher Metallic Matte Blue Haze" (512F)
- 3mm bicones "Green-Pink-Yellow" (from China)

- 15/0 seed beads Miyuki "Dark Bronze" (457D)
- 11/0 seed beads Miyuki "Dark Bronze" (457D)
- 8/0 seed beads Miyuki "Dark Bronze" (457D)
- 11/0 seed beads Toho "Opaque Avocado Pink Marbled" (1209)
- 3mm bicones "Bittersweet AB" (from China)

- 15/0 seed beads Miyuki "Bronze" (457)
- 8/0 seed beads Miyuki "Bronze" (457)
- 11/0 seed beads Toho "Gilded Marble Turquoise" (1703)
- 3mm bicones "Light Topaz AB" (from China)

- 15/0 seed beads Miyuki "Dark Bronze" (457D)
- 11/0 seed beads Miyuki "Dark Bronze" (457D)
- 8/0 seed beads Miyuki "Dark Bronze" (457D)
- 11/0 seed beads Toho "Opaque Lavender AB" (412)
- 3mm rondelles "#C12AB" (Beads One)

- 15/0 seed beads Miyuki "Dark Bronze" (457D)
- 11/0 seed beads Miyuki "Dark Bronze" (457D)
- 8/0 seed beads Miyuki "Dark Bronze" (457D)
- 11/0 seed beads Toho "Opaque Light Blue Amethyst Marbled" (1204)
- 3mm bicones "Purple AB" (Chinavoski)

- 15/0 seed beads Miyuki "Dark Bronze" (457D)
- 11/0 seed beads Miyuki "Dark Bronze" (457D)
- 8/0 seed beads Miyuki "Dark Bronze" (457D)
- 11/0 seed beads Toho "Copper Lined Alabaster" (0741)
- 3mm rondelles "Vintage Rose AB" (Beads One)
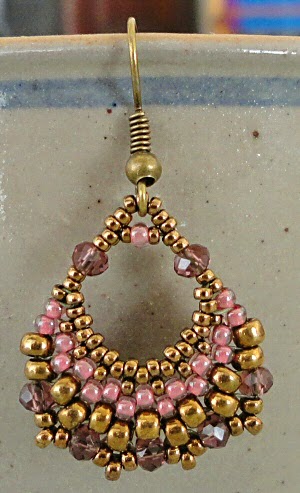
- 15/0 seed beads Miyuki "Dark Bronze" (457D)
- 11/0 seed beads Miyuki "Dark Bronze" (457D)
- 8/0 seed beads Miyuki "Dark Bronze" (457D)
- 11/0 seed beads Toho "Transparent Lustered Rose Mauve Lined" (291)
- 3mm rondelles "Burgundy" (Chinavoski)

- 15/0 seed beads Miyuki "Dark Bronze" (457D)
- 11/0 seed beads Miyuki "Dark Bronze" (457D)
- 8/0 seed beads Miyuki "Dark Bronze" (457D)
- 11/0 seed beads Miyuki "Galvanized Dusty Lilac" (1062D)
- 3mm rondelles "#C12 AB" (Beads One)

UPDATE: To get you started the way that I made mine, pick up twenty-one 15/0 seed beads + a bicone/rondelle + three 15/0 beads + an 11/0 bead + three 15/0 beads + a bicone/rondelle. Go back around through these beads again to make a circle. Don't tie a knot or you won't be able to get your needle back through these beads again later.
Also, I recommend FireLine. You can also use Nymo B thread but you might need to take some shortcuts later when you can no longer get through some of the beads at the top. I had no trouble when I used 6-pound FireLine. Nymo D won't work at all. It's much too thick.
After making the loop of beads, add another row of 15/0 beads using peyote stitch. You'll add two rows of each size of beads so the next two rows will be 11/0 beads and then you'll add two rows of 8/0 beads. I like to add the loop at the top after I've completed the two rows of 15/0 beads. Add the bicones along the bottom last and then add some 15/0 picots between them.

Linda where did you buy your pretty 11/0 beads? Gorgeous earrings. I have never done any peyote stitch before is it difficult? Ann
ReplyDeleteSome I've had for a long time (Gilded Marble Turquoise) but lately I've been buying 11/0's and 8/0's with unique finishes and colors whenever I see them. I got most of these from Aura Crystals.
DeleteI don't have a lot of experience with peyote stitch, Ann. In fact, it took me a little while to get the hang of it when I first tried this pattern. At first I kept ending up with a jumble of beads and I couldn't tell which one I needed to go through next. Then it clicked in my head and I realized that I needed to push all the previous beads together snugly when I added the next bead. And, the bead that I added needed to stick out from the row so that I could go through it again in the next round. So, push the previous beads together to compact them and make sure that the current bead sticks out before adding the next bead. You want the work to be quite tight so there aren't a lot of gaps between the seed beads. Once you have the first row made, it gets easier to see what to do.
Such beautiful pieces. For the benefit of all beaders, can you please do a YouTube tutorial because some of us understand it better with visuals than written instructions. I love your colour combos
ReplyDeleteI don't have the capability of making a video. Plus, these earrings aren't my own design so I can't post a tutorial for them anyway. What I could do, when I've got a chance, is post some step-by-step photos showing how to make the first couple of rows of the peyote stitch.
DeleteYou have made enough changes to claim this as your own design Linda since the link goes to an infected website perhaps you could Mention the designer and publish your version of it that is not infringing
DeleteI keep thinking there is a way to continue a bezel and put a rivoli in the round open space...? Hmm...
ReplyDeleteNice work and great colors, as always!
I think I'd start with a bezeled rivoli and add the peyote bit to the bottom of it rather than the other way around.
DeleteWow Linda I admire your work. I am a huge fan. Thank you for sharing your talent. I am self taught and appreciate your kindness and generosity. I will definitely try this pattern. Wish me luck!
ReplyDeleteHopefully you'll be able to figure it out. I do strongly suggest starting out with a loop of beads instead of the way the tutorial says to do it. That makes it so much easier.
DeleteWill do Linda. Thanks so much!
DeleteThank so much will make a pair for Mother's Day here in the states hug Miss Linda
ReplyDeleteI'm in the states too. Were you able to access the website with the tutorial? Last I heard the website had been infected by malware. I'm afraid to click the link to find out.
DeleteWhere do you get your 3mm bicones from china from?
DeleteIt's been a very long time since I last ordered them. There were two eBay shops that I used. One no longer has bicones but the other one still has them. Here's the link:
Deleteliliang1987one Crystal Shop
Click HERE to go directly to the page that I ordered from.
I have seen and tried a similar earring pattern, what you have done with this is so much better!! Thank you for the inspiration and instructions. I also order from Aura Crystals on a regular basis, they have 3mm bicones and 3mm rondelles available, they are fast and reliable.
ReplyDeleteI did exactly what u said and it ends up in a fan shape and not a semi circle. Can you give more specifics?
ReplyDeleteThey are sort of fan shaped. It was the original designer of the pattern who called them "semi-circlular". Take a look at my "Peyote Fan Earrings" pattern. It might help you with these even though they're not made exactly the same. I assume that you've got this pattern because my tips are only to get you started. I can't post someone else's pattern here on my blog and I don't want to send anyone to an infected website to get it.
DeleteThese earrings are gorgeous, I will be trying this pattern, definitely. Thank you so much. Can't wait to wear them.
ReplyDelete