Thursday, May 22, 2014

Bracelet of the Day: Duo Bobble Band Variation - Purple Luster


DUO BOBBLE BAND VARIATION (Liz Band)
  • 11/0 seed beads Miyuki “Metallic Olive Brown” (11-457H)
  • SuperDuo beads ”Opaque Purple"
  • 3mm druks "Opaque Amethyst Luster"
This pretty purple bracelet is the same variation of the same pattern that I blogged about on March 17 HERE. As I've mentioned before, the pattern is my friend Teejay's adaptation of Deborah Roberti's Bobble Bangles pattern. Actually, this version is my adaptation of Teejay's adaptation because I've left off the embellishment that goes around the SuperDuo beads.

UPDATE 2/13/18: A free pattern is now available and the new name for this pattern is "Liz Band". Visit THIS post to download the free pattern.


Wednesday, May 21, 2014

Bracelet of the Day: SuperDuo Rosette Variation

SUPERDUO ROSETTE BRACELET VARIATION
  • 15/0 seed beads Miyuki "Dark Bronze" (15-457D)
  • 11/0 seed beads Miyuki "Dark Bronze" (11-457D)
  • 8/0 seed beads Miyuki "Dark Bronze" (8-457D)
  • 3mm druks "Opaque Rose and Topaz Luster
  • SuperDuo beads "Crystal Gold Luster"


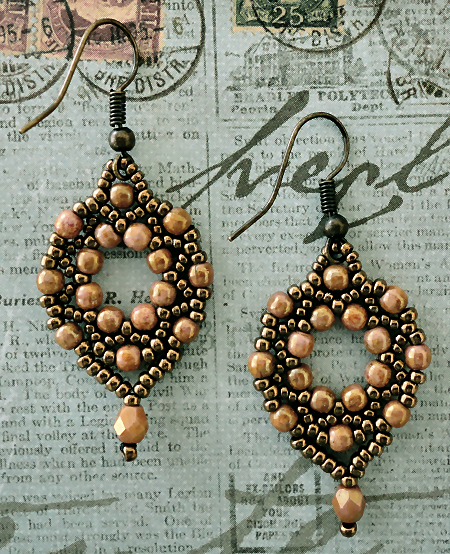
This is the third SuperDuo Rosette bracelet that I've made in the past few days. Although I don't like it quite as well as the first two, it's very pretty and I made it to go with these earrings:


I wanted to wear those earrings on Monday and realized that I didn't have a bracelet that would go well with them. It's a little hard to see the rose/pink color of the druks in the bracelet but they're the same ones that I used in the earrings. Because the pink isn't very obvious, I think I could also wear this bracelet with pretty much any outfit because it almost looks like it's all bronze.

I was going to make this bracelet with 11/0 and 15/0 seed beads like I did on Tuesday's bracelet but because of the nearly monochrome color of this one that looked too boring. So, I came up with a slightly different tweak for the netting. This time I picked up an 11/0, then an 8/0, an 11/0 and a SuperDuo bead in steps 5 and 6 of the tutorial. Then, to complete the netting later, I added two 15/0 seed beads on either side of the three anchor beads. Don't be tempted to squeeze in three of them though. I tried that and the bracelet came out very stiff. I also added an 8/0 seed bead to the ends of my clasp loops for attaching jump rings. That way I was able to adjust the length without having to add another motif. I used two small jump rings on each end of the magnet clasp and it fits perfectly. I also used 8/0 seed beads between each motif.

As you can see in the photos, the gold SuperDuo beads are somewhat transparent. I would love to buy some regular opaque bronze SuperDuos sometime but they're very expensive. These are the "poor woman's" version. When the light isn't shining through them, they look pretty much like opaque bronze. For comparison, 15 grams of the opaque metallic "Bronze" SuperDuos are $7.35 at Aura Crystals. Although they don't currently have them in stock, I got 15 grams of the "Crystal Gold Luster" beads for $4.69 a couple months ago.

You can buy the bracelet pattern HERE. The earrings are based on the free Arula Earrings tutorial HERE. I used 3mm druks instead of Rulla beads and I don't remember if I had to adjust anything to make them work.


Tuesday, May 20, 2014

Bracelet of the Day: SuperDuo Rosette Bracelet Variation

SUPERDUO ROSETTE BRACELET VARIATION
  • 15/0 seed beads Miyuki "Dark Bronze" (15-457D)
  • 11/0 seed beads Miyuki "Dark Bronze" (11-457D)
  • 3mm druks "Bronze Antique" (Nirvana Beads)
  • SuperDuo beads "Metallic Suede Gold"
This is the other bracelet that I told you about yesterday (see yesterday's post for the changes I made to the pattern). It's the same pattern but this time I used smaller, shiny metallic seed beads instead of matte ones for a little different look. This version looks more like Sam Wescott's original pattern but with the netting tacked down to keep it from shifting around. I didn't get the nice rounded netting that I would have gotten by following the patter, but I think it still looks very nice this way. The effect is just a little more compact-looking. I will have to re-make this one though because it's a little snug. Adding another motif will make it too long so I'll just use a different clasp and/or maybe make the loops slightly longer. I didn't have this problem with the bracelet that I posted yesterday because the 8/0 seed beads between the motifs added some extra space. Plus, I used quite a long clasp on that one. I like to use those oblong filigree clasps with this pattern because the shape compliments the shape of the motifs quite well.

The "Bronze Antique" druks that I used are actually a very dark green with a speckled "antique" finish on them. If you can't find that color, I think that "Jet Black Picasso" druks would look very similar and would go fine with the SuperDuo color.

You can buy Sam's pattern in her Etsy shop HERE.


NOTE: If you read yesterday's post before I fixed my typos, I had the wrong bead sizes given for my tweaks and I forgot to mention something. Everything should be correct now.

There's one other thing that I should mention and it's something I do with most of my beadwork. I recommend going back around through all of the netting a second time before knotting and cutting your thread. This will snug up any loose beads.


Monday, May 19, 2014

Bracelet of the Day: SuperDuo Rosette Variation


SUPERDUO ROSETTE BRACELET VARIATION
  • 11/0 seed beads Miyuki "Brown Bronze Matte" (11-457P)
  • 8/0 seed beads Miyuki "Brown Bronze Matte" (8-457P)
  • 3mm druks "Champagne" (Nirvana Beads)
  • SuperDuo beads "Metallic Suede Olive"
  • Bronze filigree clasp (Beadaholique)

Yesterday I finally made two of these bracelets for myself. I've made the pattern many times but always gave the bracelets away as gifts. After trying a few different color combinations, I came up with two scrumptious bracelets. The colors are actually almost the same in both of them but reversed. To keep them from looking identical, I used different seed beads and clasps on them.

The reason that I'm calling this a variation, is because I tweaked the way the netting beads are added. If you follow the pattern as written, the netting can sometimes come out a little loose which sometimes allows the thread to show along the edges of the SuperDuo beads. I got this idea from a tweak that Laurie Brennan came up with for another of Sam Wescott's patterns called "Toying with Tiles". That pattern has similar netting around SuperDuos and she came up with a way to anchor them so that they stay put. I'd actually tried something like that with the "SuperDuo Rosette" pattern before, without much luck, but this time I did it a little differently. This does change the look of the netting a little but not really in a bad way. And, when I use larger seed beads, the change is hardly noticeable.

The changes are in steps 5 and 6 of the tutorial. In both steps, when told to add a new SuperDuo bead, instead I picked up an 11/0 seed bead, an 8/0 seed bead, another 11/0 seed bead and then the SuperDuo bead and proceeded as directed. Those three seed beads are the anchor beads which you will go through at the end when you add the remaining netting beads. Depending on the sizes of the seed beads you use, you'll either add 3 more 11/0's on either side of the anchor beads or 2, if you're using larger beads like I did in this bracelet. Just use however many fit the best. I also used 8/0 seed beads between the motifs instead of 11/0's.

If you can't find the "Champagne" druks, "Opaque Green Luster" druks look very similar. They're just a little more green.

I'll post the other bracelet tomorrow. In the meantime, you can buy Sam's wonderful pattern, HERE.


Sunday, May 18, 2014

Bracelet Remake: Double Diamond Bracelet


I posted this as my Bracelet of the Day back on April 27th. The one I posted was one of the first bracelets that I made when I first learned to bead and HERE is a link to the free pattern that I used. In fact, the file name for the photo is "Bracelet 17" and I'm now on "Bracelet 161". I've actually made a lot more bracelets than that but some were multiples of the same one and a lot were samples that I later scrapped. Only complete, finished bracelets get a number. I do the same thing for my earring photos.

I was sorting through my bracelets yesterday and came upon this one. As I'd mentioned in my other post, it was starting to get a little ratty-looking and threads were coming loose. I really like the bracelet so I decided to remake it last night. I wasn't looking forward to working with the cheap Chinese seed beads but I didn't have anything close to that nice copper color in Japanese seed beads. Luckily, I remembered that I'd culled a bunch of them, back when I used to use those beads, and they were set aside in a little bag. I used a #12 needle and Nymo B thread so I had no trouble making multiple passes through the beads. 


I wasn't happy with the way I'd attached the clasp originally so I came up with a different sort of loop this time. Good thing that I did because the bracelet would have been a little snug without the loop being a little longer. Apparently the thread in my old bracelet had stretched out a bit so the whole bracelet "grew" a little over time. I made that bracelet before I knew about conditioning and stretching your thread before using. Now my beadwork never gets loose over time and my thread is MUCH easier to work with. I use Thread Heaven to condition my thread and would never even make a sample without using it on my thread first. Here's a photo showing a brand new container of Thread Heaven next to one that shows how mine usually looks in a very short time:


Click HERE to go to the Thread Heaven website for more information. HERE is a page where they explain how to use the product.
The photo at the bottom of this post shows the old and new bracelets side-by-side (the top one is the older one). One thing that's pretty obvious is that the copper beads have lost a lot of color since I originally made the old one. I was reminded of this problem last night when I ended up with orange fingers by the time I'd finished making the new bracelet. 

UPDATE: I did some searching online and I think those teal beads are from Miyuki. The name is "Colorlined Teal Matte AB". Here's what they look like close up:


DOUBLE DIAMOND BRACELET
  • 11/0 seed beads Cousin "Copper" (Walmart)
  • 8/0 seed beads "Matte Variegated Teal" (F259A - unknown brand)

Monday, May 12, 2014

Graphics Project: Art Nouveau Frame


Although I don't have a tutorial for this project, I did save all the bits and pieces that I used to make it. I've included in the ZIP file a PSD file with all of the layers intact, as well as a BladePro preset and some textures. The only thing that's not in the ZIP file is an old paper texture but it is one of the layers in the PSD image. If you copy that layer, and paste it as a new image, you'll have the full size uncropped paper texture.

You can download the ZIP file HERE.


UPDATE: Here is a PNG of the frame:

Sunday, May 11, 2014

Layered Tila Earrings


I wanted some earrings to go with my favorite "Trestle Bands" bracelet, which I posted about HERE, and this pattern was perfect. It incorporated some Tila beads as well as two colors of fire polished beads that pretty closely match the colors in the bracelet. My earrings are adapted from the "Layered Tila Bracelet" pattern from MyAmari which you can find HERE.

UPDATE: Yvonne King's (MyAmari) "Layered Tila Bracelet" pattern is now available from her blog HERE.

UPDATE 6/6/19: All of the previous links to this pattern are dead. You can get the free "Layered Tila Bracelet" pattern HERE on Bead-Patterns.com.
 
Here's what I used:

  • 3mm fire polished beads "Bronze Illusion"
  • 4mm fire polished beads "Alexandrite Celsian"
  • 15/0 "Dark Bronze" seed beads (15-457D)
  • 11/0 "Dark Bronze" seed beads (11-457D)
  • Tila beads "Matte Metallic Bronze"