Wednesday, March 5, 2014

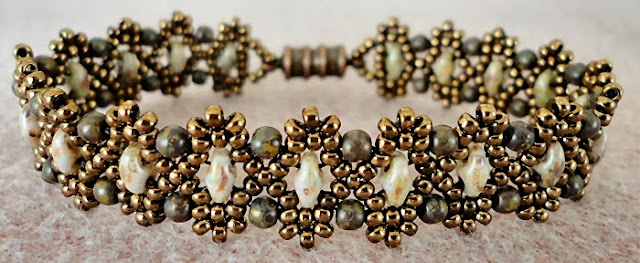
Bracelet of the Day: Duo Bobble Band Variation - Mint Chocolate

DUO BOBBLE BAND VARIATION - MINT CHOCOLATE
  • 11/0 seed beads Miyuki "Metallic Chocolate" (11-461)
  • SuperDuo beads "Chocolate Bronze"
  • 3mm druks "Mint Picasso" (Nirvana Beads)
While making one of my favorite bracelet patterns, I decided that I didn't like how the pale mint druks looked along the edge with all of the dark "chocolate" seed beads. They sort of disappeared and all I could see were the dark seed beads. So, I thought I'd try adding some netting between the motifs and I was pleased with the result.

Here you can see how the pattern looks without the netting:


I went through each trio of 11/0 seed beads along the edge and added three more seed beads between them. That was just right for this combination of beads but it might take more with different beads depending on how much space there is between the motifs.


Tuesday, March 4, 2014

Bracelet of the Day: Straight and Narrow

STRAIGHT AND NARROW BRACELET
  • 15/0 seed beads Miyuki "Dark Bronze" (15-457D)
  • 8/0 seed beads Miyuki "Dark Bronze" (8-457D)
  • 4mm fire polished beads "Alexandrite Celsian" *
  • 3mm ivory pearls (Beads One)
This pattern was a special download from the August/September 2011 issue of Beadwork Magazine. It's super easy to make yet turns out very pretty. I've tried different types of fire polished beads and decided that I like how it looks best with clear, sparkly colors rather than opaque colors or ones with Picasso finishes. I made one change to the pattern. It calls for 4mm pearls but I thought they covered up the fire polished beads too much and I wanted the color to show as much as possible. I have a feeling that 4mm was a typo in the magazine though because the bracelets in the photos look like they have 3mm pearls on them. The idea is that they should just cover up the hole in the center of each little square of fire polished beads.

First you build a right angle weave base with the fire polish beads, then you go up and down both sides of the bracelet adding 8/0 seed beads along the edge between each one. The final embellishment is to cross each square diagonally with two 15/0 seed beads with a pearl between them.

I have one tip for working this one. As you're adding the embellishments, watch out for the bracelet wanting to twist. Smooth out the beads whenever this starts to happen so that it will end up flat when you're finished.

The pattern is available for download HERE for $7.99.

* They used "Aqua Celsian" in the photo on the pattern and it looks very nice.


Monday, March 3, 2014

Looking for an elusive earring pattern...


Just about everyone has these earrings pinned on their Pinterest boards, and I've seen them on numerous blogs, but I can't seem to track down the pattern, either free or for sale anywhere. Does anyone know where to get this pattern? I wanted to make them so badly that I figured out how to do it myself and I've also come up with a smaller version that makes round earrings. I don't need the pattern for myself but I'd like to be able to post a link to it so that the creator gets the credit due them whenever I post about them.


The original earrings are made with 4mm fire polished beads and 11/0 seed beads but I've also successfully made them with 3mm fire polished beads and 15/0 seed beads as you can see below. The earring on the far right is my round version which is also made with 3mm fire polished beads and 15/0 seed beads. 


UPDATE:
Here's the link to a video tutorial:

https://www.youtube.com/watch?v=bNJNAbAEFZQ


Besides these earrings, there is a lot of gorgeous beadwork on the Sereine Creations blog here:

http://tinyurl.com/nm3wxa2


Bracelet of the Day: Hugs & Kisses - Smoky Topaz

HUGS & KISSES BRACELET
  • 11/0 seed beads Miyuki "Dark Bronze" (11-457D)
  • 15/0 seed beads Miyuki "Dark Bronze" (15-457D)
  • 4mm fire polished beads "Opaque Smoky Topaz Gold Luster"
  • 6mm fire polished beads "Opaque Smoky Topaz Gold Luster"

Although I used the "Renaissance Bracelet" pattern, this version is actually called "Hugs & Kisses" (Unfortunately, this pattern is no longer available). After adding the diagonal netting in one direction, you go back the other way and cross the "X's" by going through the center 15/0 bead of the first side of the "X". I made several of these bracelets for Christmas last year and made these "Loretta" earrings to go with them:


Sunday, March 2, 2014

Bracelet of the Day: Coin Bands - Metallic Blue

COIN BANDS
  • Tila beads "Metallic Blue Oil Matte" (TL-401FR)
  • 11/0 seed beads Miyuki Duracoat Galvanized "Pewter" (11-D4222) 
I made this set for Teejay for Christmas. Although the pattern calls for CzechMates, it also works quite well with Tila beads. The pattern is from Deborah Roberti and you can buy it HERE for $4.00. I made a pair of earrings to match:


Saturday, March 1, 2014

Bracelet of the Day: St. Petersburg Chain


ST. PETERSBURG CHAIN

This bracelet was a gift from Teejay so I can't give you a list of the beads it contains. St. Petersburg Chain isn't one of my favorite stitches. I don't enjoy doing it and I'm not crazy about the look of it most of the time. However, I love this bracelet and I love wearing it. Because of the dark colors of the beads, the "St. Pete" look doesn't stand out and it's very soft and comfortable to wear. The two main things that I don't like about the stitch are that there's no neat way to end it and attach a clasp and also because the design is asymmetrical. I don't know why, but that bothers me. I like my bracelets to have a "center". So, this may end up being the one and only St. Petersburg bracelet that I'll ever wear unless Teejay comes up with another one that's as nice as this one.

I made the earrings with some charms from Beads One. I think the pair cost me about a quarter to make.

Here are some links to various tutorials for St. Petersburg Chain:

Aboutdotcom

YouTube - Double St. Petersburg Chain

Off the Beaded Path (YouTube Video)

Below is a sample that I made a long time ago. I've never made a complete St. Pete bracelet.


I thought you might like to see the samples I made yesterday using the new "suede" SuperDuo beads that I bought recently. The only place I've seen them so far is at Aria Design Studio on Etsy. They come in several colors and they have a different finish than other SuperDuo beads. They're metallic matte with a kind of soft glow.


The pale, almost green ones are called "Metallic Suede Gold" and the darker ones in the earring on the left are "Metallic Suede Olive". They also come in a couple of shades of purple, teal, brown and pink. I made the bracelet sample with Deb Roberti's "Farfalle Bracelet" pattern which you can buy HERE. There is no pattern for the earrings. I based them on a photo that I saw online somewhere.
 

Before & After: Dove Girl Greeting Card

I found the "before" picture somewhere online and it needed a lot of fixing up to make it usable for a greeting card. Here is how it looked as I found it:


Here is how it looks after a lot of work in Paint Shop Pro:


I used the final image to make this birthday card for a friend:


You can download the full-size images HERE.